Aclnn算子工程化开发快速入门
本文是基础内容,通过一个完整的AddCustom算子示例,帮助您在5分钟内跑通从创建工程、补充算子实现、编译部署到单算子API调用验证的端到端流程。
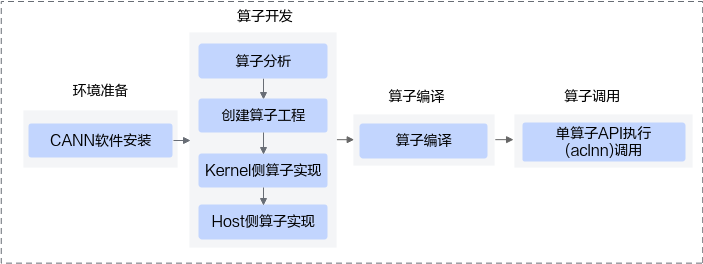
前置环境准备
编译工具链
在开始之前,请确保系统中已安装以下工具:
| 工具 | 版本建议 | 说明 |
|---|---|---|
| CMake | ≥ 3.19 | 构建系统生成器。 |
| GCC / G++ | ≥ 7.5 | C++编译器。 |
| Python | ≥ 3.9 | msOpGen工具运行依赖。 |
| Make | — | 构建执行工具。 |
msOpGen是CANN软件包提供的算子工程生成工具。加载CANN环境变量后,可通过msopgen --help验证工具是否可用;如果命令不在PATH中,也可使用${INSTALL_DIR}/python/site-packages/bin/msopgen调用,其中${INSTALL_DIR}为CANN软件安装路径。
可通过以下命令检查工具版本:
cmake --version
g++ --version
python3 --version
make --version
CANN环境变量
编译和运行均依赖CANN提供的环境变量,在开始任何步骤前,先加载环境变量:
source /usr/local/Ascend/cann/set_env.sh
每次打开新终端时都需要重新执行该命令。后续步骤中不再重复提示。
快速入门流程
步骤概览
| 步骤 | 内容 | 预计时间 |
|---|---|---|
| 步骤1 | 创建工程 | 1分钟 |
| 步骤2 | 查看目录结构 | — |
| 步骤3 | 修改核函数(Kernel)侧代码 | 1分钟 |
| 步骤4 | 修改Host侧Tiling | 1分钟 |
| 步骤5 | 编译 | 1分钟 |
| 步骤6 | 部署 | — |
| 步骤7 | 调用算子 | 1分钟 |
创建工程
编写算子原型定义文件add_custom.json(建议放在全英文路径下),然后使用msOpGen工具生成工程骨架。JSON中每个输入/输出的format和type列表长度必须一致,保持一一对应关系。
[
    {
        "op": "AddCustom",
        "input_desc": [
            {
                "name": "x",
                "param_type": "required",
                "format": ["ND", "ND", "ND"],
                "type": ["float16", "float", "int32"]
            },
            {
                "name": "y",
                "param_type": "required",
                "format": ["ND", "ND", "ND"],
                "type": ["float16", "float", "int32"]
            }
        ],
        "output_desc": [
            {
                "name": "z",
                "param_type": "required",
                "format": ["ND", "ND", "ND"],
                "type": ["float16", "float", "int32"]
            }
        ]
    }
]
# 将上面的JSON内容保存为add_custom.json后执行:
source /usr/local/Ascend/cann/set_env.sh
msopgen gen -i add_custom.json -c ai_core-ascendxxyy -lan cpp -out AddCustom
- -i:指定算子原型定义文件add_custom_.json所在路径,请根据实际情况修改。
- -c:
ai_core-ascendxxyy代表算子在AI Core上执行,ascendxxyy为昇腾AI处理器的型号soc_version。JSON中的type/format列表定义算子支持的数据类型和格式组合。msOpGen会基于这些信息生成对应的核函数(Kernel)编译配置。 - -lan:参数cpp代表算子基于Ascend C编程框架,使用C/C++编程语言开发。
- -out:生成文件所在路径,可配置为绝对路径或者相对路径,并且工具执行用户对路径具有可读写权限。若不配置,则默认生成在执行命令的当前路径。
将ascendxxyy替换为您的AI处理器型号soc_version。msOpGen会自动将芯片型号映射为框架统一标识,并写入CMakePresets.json的ASCEND_COMPUTE_UNIT和原型定义的AddConfig中。
说明 其中,AI处理器型号soc_version请通过以下方式获取:
针对如下产品:在安装AI处理器的服务器执行
npu-smi info命令进行查询,获取Name信息。实际配置值为AscendName,例如Name取值为xxxyy,实际配置值为Ascendxxxyy。Atlas A2 训练系列产品/Atlas A2 推理系列产品
Atlas 200I/500 A2 推理产品
Atlas 推理系列产品
Atlas 训练系列产品
- 针对
Atlas A3 训练系列产品 /Atlas A3 推理系列产品 ,在安装AI处理器的服务器执行npu-smi info -t board -i <id> -c <chip_id>命令进行查询,获取Chip Name和NPU Name信息,实际配置值为Chip Name_NPU Name。例如Chip Name取值为Ascendxxx,NPU Name取值为1234,实际配置值为Ascendxxx_1234。其中:id:设备id,通过npu-smi info -l命令查出的NPU ID即为设备id,命令中表示为<id>。chip_id:芯片id,通过npu-smi info -m命令查出的Chip ID即为芯片id,命令中表示为<chip_id>。
- 针对Ascend 950PR/Ascend 950DT,在安装AI处理器的服务器执行
npu-smi info -t board -i <id>命令进行查询,获取Chip Name和NPU Name信息,实际配置值为Chip Name_NPU Name。例如Chip Name取值为Ascendxxx,NPU Name取值为1234,实际配置值为Ascendxxx_1234。
其中:id为设备id,通过npu-smi info -l命令查出的NPU ID即为设备id,命令中表示为<id>。
查看目录结构
msOpGen生成的工程目录结构如下:
AddCustom
├── build.sh                  // 编译入口脚本
├── CMakeLists.txt            // 工程CMakeLists.txt
├── CMakePresets.json         // 芯片型号等编译预设配置(msOpGen自动生成)
├── framework                 // AI框架适配插件目录(入图场景使用,初学可忽略)
├── op_host                   // Host侧实现文件
│   ├── add_custom.cpp        // [需修改] 算子原型注册、Tiling实现
│   └── CMakeLists.txt
└── op_kernel                 // 核函数(Kernel)侧实现文件
    ├── add_custom.cpp        // [需修改] 算子代码实现
    ├── add_custom_tiling.h   // [需修改] Tiling数据结构定义
    └── CMakeLists.txt
需要修改的文件已用[需修改]标注,后续步骤将逐一修改这些文件。
msOpGen生成的op_host/add_custom.cpp已包含namespace ops(算子原型注册)和namespace ge(InferShape/InferDataType)的框架代码,以及TilingFunc函数的空实现。后续只需修改TilingFunc的实现,保留框架代码不变。
修改核函数(Kernel)侧代码
编辑op_kernel/add_custom.cpp,将自动生成模板中的内容替换为完整的算子计算实现:
#include "kernel_operator.h"
#include "add_custom_tiling.h"

using namespace AscendC;

class KernelAdd {
public:
    __aicore__ inline KernelAdd() {}
    __aicore__ inline void Init(GM_ADDR x, GM_ADDR y, GM_ADDR z,
                                uint32_t totalLength, uint32_t tileNum)
    {
        this->totalLength = totalLength;
        this->tileNum = tileNum;
        xGlobal.SetGlobalBuffer((__gm__ float*)x);
        yGlobal.SetGlobalBuffer((__gm__ float*)y);
        zGlobal.SetGlobalBuffer((__gm__ float*)z);

        pipe.InitBuffer(xQueue, 1, totalLength / tileNum * sizeof(float));
        pipe.InitBuffer(yQueue, 1, totalLength / tileNum * sizeof(float));
        pipe.InitBuffer(zQueue, 1, totalLength / tileNum * sizeof(float));
    }

    __aicore__ inline void Process()
    {
        uint32_t lengthPerBlock = totalLength / tileNum;
        uint32_t lengthPerCore = totalLength / GetBlockNum();
        uint32_t coreOffset = lengthPerCore * GetBlockIdx();

        for (uint32_t i = 0; i < lengthPerCore / lengthPerBlock; i++) {
            uint32_t offset = coreOffset + i * lengthPerBlock;
            CopyIn(offset, lengthPerBlock);
            Compute(lengthPerBlock);
            CopyOut(offset, lengthPerBlock);
        }
    }

private:
    __aicore__ inline void CopyIn(uint32_t offset, uint32_t length)
    {
        LocalTensor<float> xLocal = xQueue.AllocTensor<float>();
        LocalTensor<float> yLocal = yQueue.AllocTensor<float>();
        DataCopy(xLocal, xGlobal[offset], length);
        DataCopy(yLocal, yGlobal[offset], length);
        xQueue.EnQue(xLocal);
        yQueue.EnQue(yLocal);
    }

    __aicore__ inline void Compute(uint32_t length)
    {
        LocalTensor<float> xLocal = xQueue.DeQue<float>();
        LocalTensor<float> yLocal = yQueue.DeQue<float>();
        LocalTensor<float> zLocal = zQueue.AllocTensor<float>();

        Add(zLocal, xLocal, yLocal, length);

        zQueue.EnQue(zLocal);
        xQueue.FreeTensor(xLocal);
        yQueue.FreeTensor(yLocal);
    }

    __aicore__ inline void CopyOut(uint32_t offset, uint32_t length)
    {
        LocalTensor<float> zLocal = zQueue.DeQue<float>();
        DataCopy(zGlobal[offset], zLocal, length);
        zQueue.FreeTensor(zLocal);
    }

    TPipe pipe;
    TQue<TPosition::VECIN, 1> xQueue;
    TQue<TPosition::VECIN, 1> yQueue;
    TQue<TPosition::VECOUT, 1> zQueue;
    GlobalTensor<float> xGlobal;
    GlobalTensor<float> yGlobal;
    GlobalTensor<float> zGlobal;
    uint32_t totalLength;
    uint32_t tileNum;
};

extern "C" __global__ __aicore__ void add_custom(GM_ADDR x, GM_ADDR y, GM_ADDR z,
                                                   GM_ADDR workspace, GM_ADDR tiling)
{
    REGISTER_TILING_DEFAULT(AddCustomTilingData);  // 注册TilingData结构体类型
    GET_TILING_DATA(tilingData, tiling);           // 反序列化tiling参数为结构体实例
    KernelAdd op;
    op.Init(x, y, z, tilingData.totalLength, tilingData.tileNum);
    op.Process();
}
以上代码展示了核函数(Kernel)侧算子实现的基本模式。
修改Tiling与Host侧实现
Tiling负责将Host侧的调度信息(如数据总量、分块数)传递给核函数(Kernel)侧执行。Tiling数据结构定义放在op_kernel/add_custom_tiling.h,供Host和核函数(Kernel)共同引用。
修改Tiling数据结构定义
编辑op_kernel/add_custom_tiling.h,使用标准C++语法定义TilingData结构体:
#ifndef ADD_CUSTOM_TILING_H
#define ADD_CUSTOM_TILING_H
#include <cstdint>

struct AddCustomTilingData {
    uint32_t totalLength;  // 总计算数据量
    uint32_t tileNum;      // 总数据分块数量
};
#endif // ADD_CUSTOM_TILING_H
修改Host侧实现
编辑op_host/add_custom.cpp,自动生成的文件已包含原型注册和TilingFunc框架。找到TilingFunc函数,将其修改为以下实现:
#include "../op_kernel/add_custom_tiling.h"
#include "register/op_def_registry.h"

namespace optiling {
const uint32_t NUM_BLOCKS = 8;
const uint32_t TILE_NUM = 8;

static ge::graphStatus TilingFunc(gert::TilingContext *context)
{
    uint32_t totalLength = context->GetInputShape(0)->GetOriginShape().GetShapeSize();
    context->SetSimdNumBlocks(NUM_BLOCKS);

    AddCustomTilingData *tiling = context->GetTilingData<AddCustomTilingData>();
    tiling->totalLength = totalLength;
    tiling->tileNum = TILE_NUM;

    size_t *currentWorkspace = context->GetWorkspaceSizes(1);
    currentWorkspace[0] = 0;

    return ge::GRAPH_SUCCESS;
}
} // namespace optiling
保留文件末尾自动生成的namespace ge(InferShape/InferDataType)和namespace ops(算子原型注册)代码不变。
以上代码展示了Host侧Tiling实现中Tiling函数和TilingData数据结构的基本写法。
编译
在算子工程根目录下执行编译脚本:
cd AddCustom
./build.sh
编译成功后,编译产物输出在build_out目录下,其中包含.run格式的算子安装包。
如需了解编译配置选项、动态库/静态库编译等更多选项,请参考算子工程编译。
部署
在算子工程根目录下,将编译产物安装到CANN目录:
./build_out/custom_opp_*.run
安装完成后,算子库和头文件会被部署到$ASCEND_OPP_PATH/vendors/customize/下:
customize
├── framework     // AI框架适配插件
├── op_api        // 单算子API头文件和动态库(aclnn_*.h、libcust_opapi.so)
├── op_impl       // 核函数(Kernel)二进制(.o)和Tiling动态库
├── op_proto      // 算子原型动态库
├── scripts       // 算子包维护脚本
└── version.info  // 版本信息
设置自定义算子包部署出来的单算子API库路径:
export LD_LIBRARY_PATH=/usr/local/Ascend/cann/opp/vendors/customize/op_api/lib/:${LD_LIBRARY_PATH}
LD_LIBRARY_PATH用于设置加载动态库时的搜寻路径列表,如需了解算子包部署路径、多版本管理等更多选项,请参考算子包部署。
调用算子
创建一个独立的验证工程来调用已部署的算子,目录结构如下:
AddCustomTest
├── CMakeLists.txt          // 编译配置
└── main.cpp                // 调用验证代码
编写main.cpp
#include <cstdio>
#include <cstdlib>
#include <cstring>
#include <vector>
#include "acl/acl.h"
#include "aclnn/aclnn_base.h"
#include "aclnn_add_custom.h"

#define CHECK_ACL(call) \
    do { \
        aclnnStatus status = (call); \
        if (status != ACL_SUCCESS) { \
            printf("ACL Error: %d at %s:%d\n", status, __FILE__, __LINE__); \
            return -1; \
        } \
    } while (0)

#define CHECK_RTL(call) \
    do { \
        aclError err = (call); \
        if (err != ACL_SUCCESS) { \
            printf("ACL RT Error: %d at %s:%d\n", err, __FILE__, __LINE__); \
            return -1; \
        } \
    } while (0)

int main()
{
    // 1. 初始化ACL
    CHECK_ACL(aclnnInit(nullptr));

    const int32_t deviceId = 0;
    CHECK_RTL(aclrtSetDevice(deviceId));

    aclrtStream stream = nullptr;
    CHECK_RTL(aclrtCreateStream(&stream));

    // 2. 准备输入数据
    const int count = 1024;
    size_t bufferSize = count * sizeof(float);

    std::vector<float> input0Host(count);
    std::vector<float> input1Host(count);
    std::vector<float> outputHost(count, 0.0f);

    for (int i = 0; i < count; i++) {
        input0Host[i] = static_cast<float>(i);
        input1Host[i] = static_cast<float>(i);
    }

    // 3. 申请设备内存
    void *input0DeviceMem = nullptr;
    void *input1DeviceMem = nullptr;
    void *outputDeviceMem = nullptr;

    CHECK_RTL(aclrtMalloc(&input0DeviceMem, bufferSize, ACL_MEM_MALLOC_HUGE_FIRST));
    CHECK_RTL(aclrtMalloc(&input1DeviceMem, bufferSize, ACL_MEM_MALLOC_HUGE_FIRST));
    CHECK_RTL(aclrtMalloc(&outputDeviceMem, bufferSize, ACL_MEM_MALLOC_HUGE_FIRST));

    // 4. 将输入数据从Host拷贝到Device
    CHECK_RTL(aclrtMemcpy(input0DeviceMem, bufferSize, input0Host.data(),
                          bufferSize, ACL_MEMCPY_HOST_TO_DEVICE));
    CHECK_RTL(aclrtMemcpy(input1DeviceMem, bufferSize, input1Host.data(),
                          bufferSize, ACL_MEMCPY_HOST_TO_DEVICE));

    // 5. 创建Tensor描述
    int64_t shape[] = {count};
    uint64_t shapeNum = 1;

    // aclCreateTensor参数:viewDims, viewDimsNum, dataType, stride(nullptr表示默认连续排布),
    //     offset, format, storageDims, storageDimsNum, tensorData
    aclTensor *input0 = aclCreateTensor(shape, shapeNum, ACL_FLOAT, nullptr, 0,
                                        ACL_FORMAT_ND, shape, shapeNum, input0DeviceMem);
    aclTensor *input1 = aclCreateTensor(shape, shapeNum, ACL_FLOAT, nullptr, 0,
                                        ACL_FORMAT_ND, shape, shapeNum, input1DeviceMem);
    aclTensor *output = aclCreateTensor(shape, shapeNum, ACL_FLOAT, nullptr, 0,
                                        ACL_FORMAT_ND, shape, shapeNum, outputDeviceMem);

    // 6. 计算workspace大小并申请内存
    uint64_t workspaceSize = 0;
    aclOpExecutor *executor = nullptr;
    CHECK_ACL(aclnnAddCustomGetWorkspaceSize(input0, input1, output,
                                             &workspaceSize, &executor));

    void *workspaceDeviceMem = nullptr;
    if (workspaceSize > 0) {
        CHECK_RTL(aclrtMalloc(&workspaceDeviceMem, workspaceSize,
                              ACL_MEM_MALLOC_HUGE_FIRST));
    }

    // 7. 执行算子
    CHECK_ACL(aclnnAddCustom(workspaceDeviceMem, workspaceSize, executor, stream));

    // 8. 同步等待执行完成
    CHECK_RTL(aclrtSynchronizeStream(stream));

    // 9. 将输出数据从Device拷贝回Host
    CHECK_RTL(aclrtMemcpy(outputHost.data(), bufferSize, outputDeviceMem,
                          bufferSize, ACL_MEMCPY_DEVICE_TO_HOST));

    // 10. 验证结果
    bool pass = true;
    for (int i = 0; i < count; i++) {
        float expected = input0Host[i] + input1Host[i];
        if (outputHost[i] != expected) {
            printf("Error at index %d: expected %f, got %f\n",
                   i, expected, outputHost[i]);
            pass = false;
            break;
        }
    }

    if (pass) {
        printf("test pass\n");
    } else {
        printf("test failed\n");
    }

    // 11. 释放资源
    aclDestroyTensor(input0);
    aclDestroyTensor(input1);
    aclDestroyTensor(output);
    aclDestroyAclOpExecutor(executor);

    if (workspaceDeviceMem) {
        aclrtFree(workspaceDeviceMem);
    }
    aclrtFree(input0DeviceMem);
    aclrtFree(input1DeviceMem);
    aclrtFree(outputDeviceMem);

    CHECK_RTL(aclrtDestroyStream(stream));
    CHECK_RTL(aclrtResetDevice(deviceId));
    aclnnFinalize();

    return 0;
}
编写CMakeLists.txt
cmake_minimum_required(VERSION 3.19)
project(AddCustomTest LANGUAGES CXX)

set(CMAKE_CXX_STANDARD 17)
set(CMAKE_CXX_STANDARD_REQUIRED ON)

# 跳过RPATH设置,避免运行时找不到动态库
set(CMAKE_SKIP_RPATH TRUE)

add_executable(execute_add_op main.cpp)

set(CANN_INSTALL_PREFIX "/usr/local/Ascend/cann" CACHE PATH "CANN安装路径")

# 头文件搜索路径:包含CANN基础头文件和算子API头文件
target_include_directories(execute_add_op PRIVATE
    ${CANN_INSTALL_PREFIX}/include
    $ENV{ASCEND_OPP_PATH}/vendors/customize/op_api/include
)

# 库文件搜索路径
target_link_directories(execute_add_op PRIVATE
    ${CANN_INSTALL_PREFIX}/lib64
    $ENV{ASCEND_OPP_PATH}/vendors/customize/op_api/lib
)

# 链接依赖库
target_link_libraries(execute_add_op PRIVATE
    cust_opapi
    nnopbase
    acl_rt
)

# 输出目录
set_target_properties(execute_add_op PROPERTIES
    RUNTIME_OUTPUT_DIRECTORY ${CMAKE_CURRENT_SOURCE_DIR}/output
)
编译与运行
# 创建build目录并编译
mkdir -p build && cd build
cmake ../ -DCMAKE_SKIP_RPATH=TRUE
make

# 运行
cd ..
./output/execute_add_op
验证成功标志及运行失败检查
程序输出以下信息,表示端到端流程跑通成功:
test pass
如果输出test failed、ACL Error或动态库not found类错误,请检查:
- CANN环境变量是否已加载(
source /usr/local/Ascend/cann/set_env.sh)。 - 算子是否已按照部署步骤正确部署。
- 核函数(Kernel)侧和Host侧代码是否按核函数(Kernel)代码、Host代码正确修改。
下一步指引
恭喜您完成了第一个算子的端到端开发!接下来建议按概述里的路径继续学习。